


These Valentine’s Day Ideas for Him & Her are simple, easy and delicious ideas to make for your Valentine’s Day dinner for two or to serve at a party.
Last week Valentine’s Day Ideas were some simple ideas that you can do with the kids at home.
It was fun to do but a lot of mess to clean up.
Plus, I had to hide the candies from my kids and that another post all by itself.
Valentine’s Day Gift Ideas for Him & Her
Well, this week Valentine’s Day Part II is for you and yours.
A cute Valentine’s day idea for him or a cute Valentine’s day idea for her.
Yes, my people.
It’s for all the lovers out there.
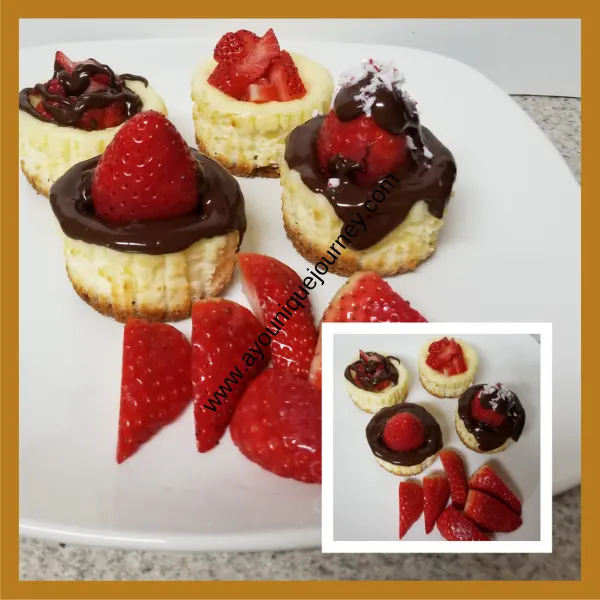
These two Valentine’s Day ideas are Strawberry Chocolate Mini Cheesecakes and Chocolate Covered Strawberries.
I love anything chocolate.
In fact, I prefer dark chocolate.
I found out that eating dark chocolate can improve your health and lower the risk of heart disease.
But hey, I am no Healthcare Consultant, so don’t say I say.
In today’s society, we have to eat anything we can, to help take care of our bodies.
After all, if we don’t, then who else will?
Valentine’s Day Idea for Him, Valentine’s Day Idea for Her.
Anyways, with these Valentine’s Ideas, you can do them just in time for Valentines Day this week.
These are perfect for your dinner for two.
I have never done cheesecake and I was impressed with the way how it turned out.
My husband loved them and already asking me to make more.
Oh and not to mention the Chocolate Covered Strawberries.
Those were a big hit for the kids.
I had to save some for myself (I hid them in the freezer… shhh) or else I don’t get any.
The life of a Mother.
I hope you will give these ideas a try.
They are simple and everyone will think that they were ordered from your local bakery.
Trust me you and yours will enjoy them on Valentine’s Day.
Plus, they are inexpensive to make
Strawberry Chocolate Mini Cheesecakes Valentine’s Day Ideas for Him & Her
These Strawberry Chocolate Mini Cheesecakes are the perfect cheesecake size to serve for your desserts after dinner or even at your Valentine’s Party.

How to make Strawberry Chocolate Mini Cheesecake Crust?
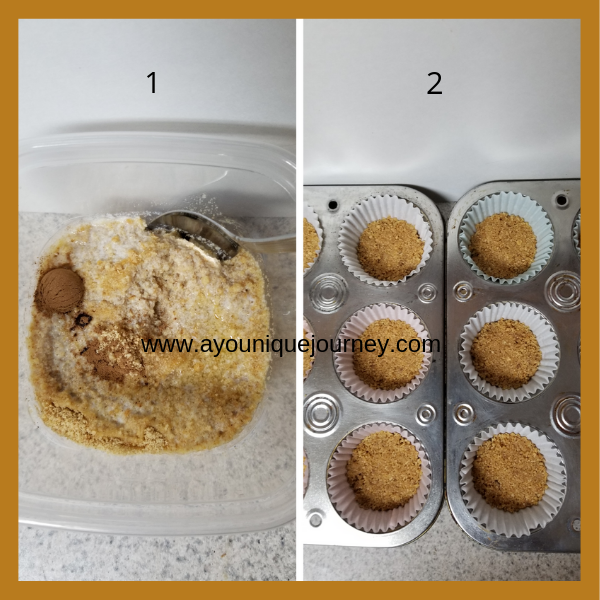
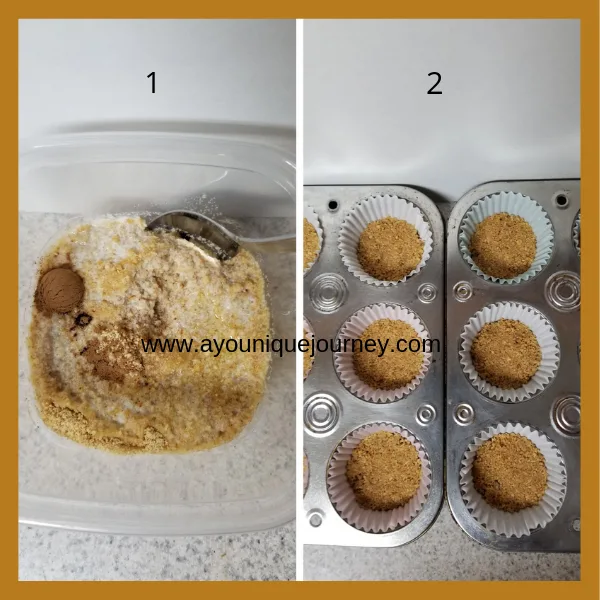
2nd picture is the completed crust in cupcake liners.
Ingredients
- ¾ cups Graham Crackers
- 3 Tbsp melted butter
- ¼ tsp cinnamon
Instructions
- Place graham crackers in a large ziploc bag and close it up. Use a roller pin to crush the crackers until it becomes crumbs.
- Add the cinnamon and whisk it. Then add the melted butter and stir until crumbs are evenly moistened.
- Put 1 Tbsp in each cupcake liners and press down to make the crust. Set aside.
How to make Strawberry Chocolate Mini Cheesecake batter

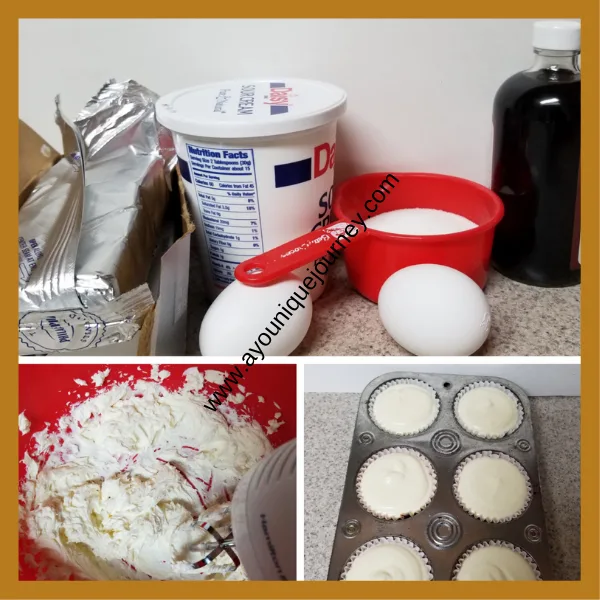
Bottom left picture is the cream cheese mixing.
Bottom right picture is the cheese cake batter ready to be placed in the oven.
Ingredients
- 16 oz cream cheese softened
- ½ cup granulated sugar
- ½ cup tsp vanilla extract
- 2 eggs
- ½ cup sour cream
Instructions
- Preheat oven to 325 degrees.
- In a medium bowl, beat the softened cream cheese for about 45 seconds to 60 seconds. Add sugar, eggs and vanilla. Continue to mix until it is smooth without lumps. Then add the sour cream and mix well.
- Fill each cupcake with about 2 to 3 tablespoons of batter.
- Place in the middle of the oven and bake for about 25 to 30 minutes.
- Remove from the oven and put on a cooling rack.
- Let them chill in the fridge for up 3 to 4 hours.
- Decorate with melted chocolate and strawberries.
- Serve and enjoy.
Also, check out my Blueberry Cheesecake, if you choose to do a bigger version to these Strawberry Chocolate Mini Cheesecake.
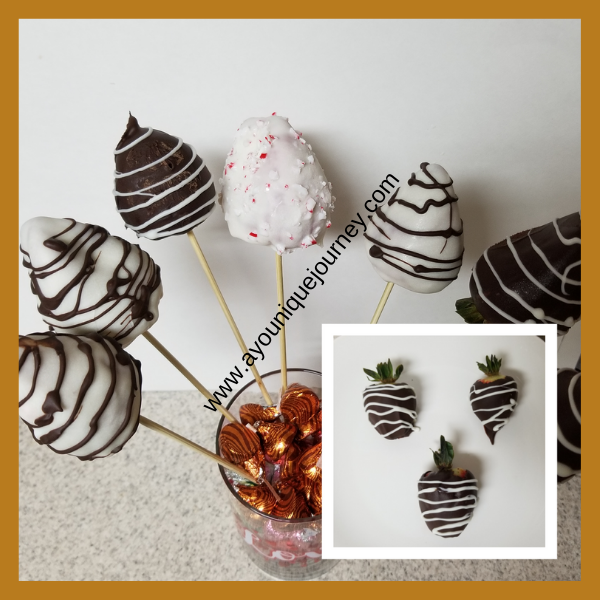
Chocolate Covered Strawberries Valentine’s Day Ideas for Him & Her
These Chocolate covered Strawberries are delicious and very easy to make.
I never thought I could make these, but after doing the second one, then it was easy for me.
My designs weren’t all that perfect, but perhaps yours will be.

How to make Chocolate Covered Strawberries Valentine’s Day Ideas for Him & Her

Ingredients
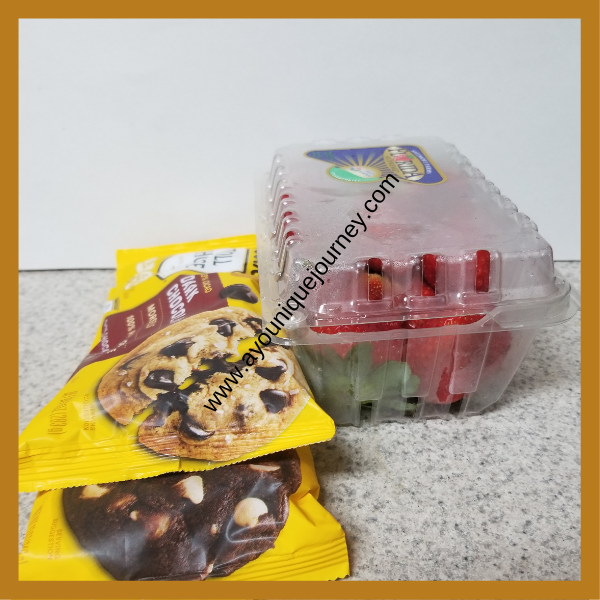
- 1 12oz package of Nestle Toll House Premier White Morsels
- 1 12oz package of Nestle Toll House Dark Chocolate Morsels
- 1lb of Strawberries or more
- A package of skewers (optional)
Instructions
- Rinse the Strawberries off with water. Pat dry them. You can remove the stems from some of the Strawberries if you want to make the ones with the skewers.
- Follow the instructions on the package to melt the chocolate (white and dark chocolate).
- For strawberries that are without a skewer: hold each strawberry at the stem and dip it in your desired melted chocolate. Allow to dry on the parchment paper.
- For the strawberries that uses skewers: place a skewer inside a strawberry and dip it in the melted chocolate. Place in a tall drinking glass, so the melted chocolate runs down and cover more towards the stem. Allow to dry.
Notes
One trick I found out is, place the strawberries in the freezer to get hard and not frozen, for about 30 minutes.
Once you dip each strawberry in the melted chocolate, the chocolate will get hard quicker.
To make the swirl on each strawberry: put some of the melted chocolate (opposite colors for each strawberry) in a small ziploc bag and cut the pointed end with a scissor.
Make sure it is a small part and make a design.
Happy Valentine’s Day!
Love, Kisses & Valentines Wishes to You & Yours!
Please let me know what you think about these Valentine’s Day Ideas in the comment section below.
Thanks for stopping by and please come back again.
Blessings and Love, as you carry on, on your YouNique Journey!